Crafting VxLAN packets using Ostinato
This post was originally published in Sep 2011 at the Inficone, but that site is now off the Internet; so reposting it here.
The buzzwords these days are “virtualization” and “cloud”. At the recently concluded VMworld 2011, VMware and Cisco announced the VxLAN technology which was developed to address scalability problems in today’s data centers.
Virtualized data centers today using traditional VLANs have scaling problems due to the 12-bit VLAN space which translates to a maximum of 4094 usable VLANs. Another requirement for multi-tenant networks is to isolate tenant traffic from one another. A VLAN could be used to provide this isolation on a L2 network but is again limited by the the 12-bit space. A L3 solution to this problem would force tenants to always use IP which would exclude tenants using non IP or other L2 protocols for inter-VM communication. Another problem is the mac address explosion at the Top of Rack switch which now needs to learn mac addresses per VM rather than per physical server.
VxLAN (short for Virtual eXtensible Local Area Network) attempts to solve these problems by creating virtual overlay L2 networks for inter-VM communication on top of the physical L2/L3 networks. It does this by doing a MAC-in-IP tunnelling and introducing a 24-bit Virtual Network Identifier (VNI) space.
For the full technical details on what problems VxLAN is attempting to solve and how, see the IETF draft (Update: Now RFC 7348).
Let’s look at the proposed frame format -
- Outer Ethernet Header (including an optional VLAN tag)
- Outer IP Header
- Outer UDP Header
- VxLAN Header
- Inner Ethernet Header (including an optional VLAN tag)
- Original Ethernet Payload (excluding the original Ethernet FCS)
- FCS for Outer Ethernet Frame
Ostinato supports all the above protocols except the new VxLAN Header. We can simulate the VxLAN header very easily using Ostinato’s Userscript protocol.
Before we write the VxLAN userscript let’s look at the VxLAN frame format
 0                   1                   2                   3
 0 1 2 3 4 5 6 7 8 9 0 1 2 3 4 5 6 7 8 9 0 1 2 3 4 5 6 7 8 9 0 1
+-+-+-+-+-+-+-+-+-+-+-+-+-+-+-+-+-+-+-+-+-+-+-+-+-+-+-+-+-+-+-+-+
|R|R|R|R|I|R|R|R|            Reserved                           |
+-+-+-+-+-+-+-+-+-+-+-+-+-+-+-+-+-+-+-+-+-+-+-+-+-+-+-+-+-+-+-+-+
|                VXLAN Network Identifier (VNI) |   Reserved    |
+-+-+-+-+-+-+-+-+-+-+-+-+-+-+-+-+-+-+-+-+-+-+-+-+-+-+-+-+-+-+-+-+
It’s a simple 8 byte header with 2 fields - Flags (8-bit) and VNI (24-bit) while the remaining fields are all reserved and MUST to be set to 0. The flag field has only one defined bit - I which indicates that the header contains a valid VNI tag while the remaining bits MUST be set to 0.
Based on this information, here’s the VxLAN userscript -
protocol.name = "VxLAN"
protocol.protocolFrameSize = function() {
  return 8;
}
protocol.protocolFrameValue = function(index) {
    var flags  = 0x08; // set I bit, reset all R bits
    var vni  = 0x749127; // example VNI value

    var pfv = new Array(8);

    pfv[0] = flags;
    pfv[1] = 0;
    pfv[2] = 0;
    pfv[3] = 0;

    pfv[4] = (vni >> 16) & 0xFF;
    pfv[5] = (vni >> 8) & 0xFF;
    pfv[6] = vni & 0xFF;
    pfv[7] = 0;

    return pfv;
}
protocol.protocolId = function() {
    return 4789; // IANA assigned
}
We first define the protocol’s name and its size. We then define the contents of the protocol as an array which we populate with the flag field set to 0x08 (I bit set, R bits reset) and an example VNI value of 0x749127. Since VxLAN is a payload for UDP, we define the port number that UDP should use in the protocolId() function. That’s all that is required to define the VxLAN protocol.
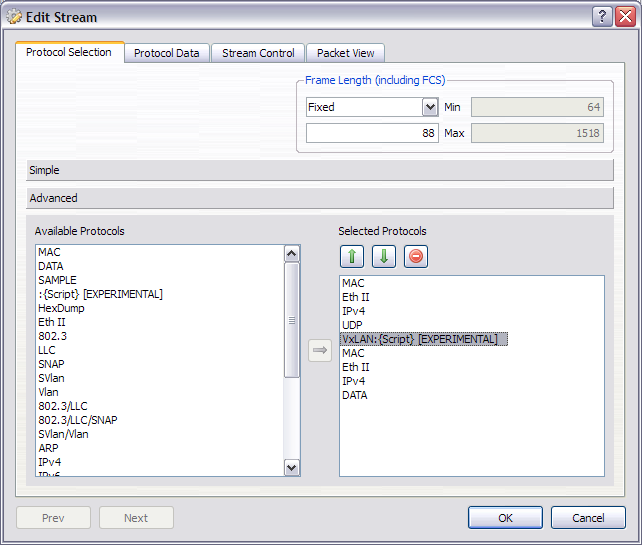
To configure the full tunnelled frame format in Ostinato, create a new stream, edit it - go to “Advanced Protocol Selection” and add the following protocols in the given order -
- MAC
- Eth II
- IPv4
- UDP
- UserScript
- MAC
- Eth II
- IPv4
- DATA
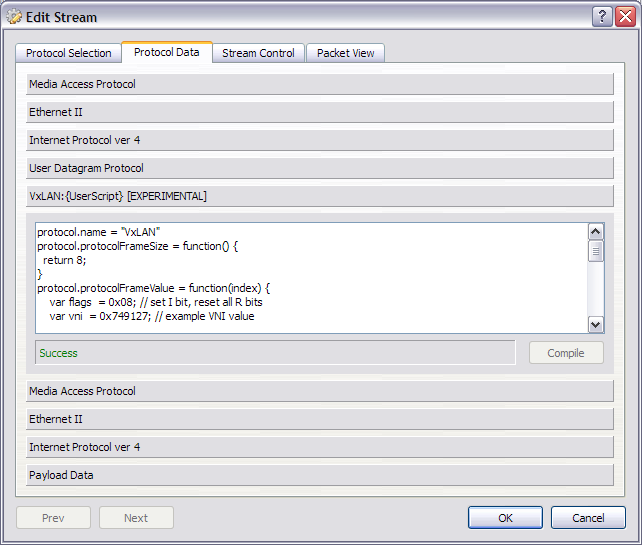
Go to protocol data tab, select UDP and override the UDP checksum field to set it as 0 (recommended by the VxLAN draft).
Next goto Userscript, copy paste the above script and click on “Compile” - you should see the compilation result as “Success”. Configure any other protocol fields that you may want and then click OK.
Click on Apply and hit play/transmit to send your VxLAN Tunnelled frames.
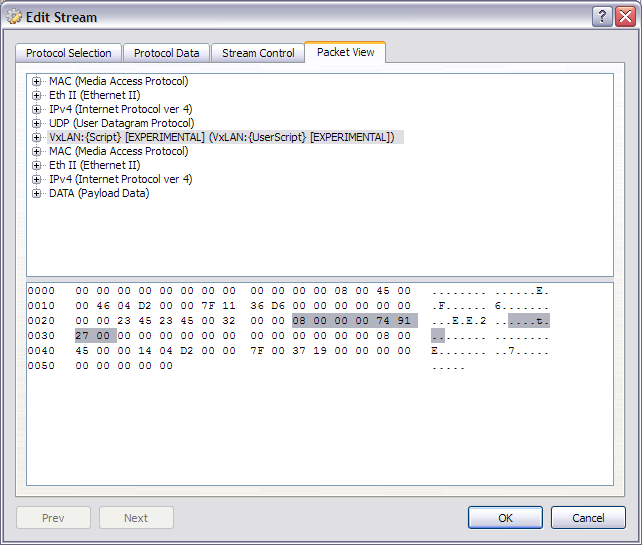
The following snapshot shows how the final packet would look like including the just created VxLan.
To make things even more simpler, you can open this stream file containing a VxLAN stream in Ostinato.
You might find these useful as well -

Leave a Comment